Thursday, 30 November 2017
Moving on
Life is a bit hectic here at the moment, with only four weeks to go until we move out of our house in Sydney (December 29th), plus all the usual end of (school) year things going on. We've just found a house on the Gold Coast (phew!) and will move in on January 8th. In between we are going on holiday - first to Canberra, Australia's capital city, for a couple of days, then we'll slowly make our way up north inland to the Gold Coast, camping along the way.
In addition to organising the move, finding new schools for the boys and temporarily homeschooling my middle son, I've also found time to do the Mayan Crochet-A-Long. The photo above was taken last week after finishing Part 4, and the photo below today, after finishing Part 5. Very much enjoying this CAL!
My youngest son recently quit gymnastics (his older brother is still doing it) and started ballroom dancing. On Saturday he had his first Dancesport Event at Sydney Olympic Park. It was great fun!
He was a semifinalist in the English Waltz and he loved the whole experience, so definitely wants to keep doing this once we move to the Gold Coast. I used to do ballroom dancing as a teenager and loved it as well, so I'm really happy that one of my sons is doing it now! The best part of the evening for me was the Parent Dance, when I got to dance the salsa with my baby!
;-)
Tuesday, 21 November 2017
Camera strap cover
On my birthday in September I got a new DSLR camera (I love taking photos - on my photo blog you can see some of them). The camera is great, much better than my old one, but I found the strap very uncomfortable. So I grabbed some scrap yarn and whipped up a cover.
I wanted it to be finished quickly, so used large stitches (UK double treble /US triple crochet).
I sewed the long edges together and slipped the cover over the strap.
With that and the Pineapple Bag done it was time to catch up with the Mayan CAL. I showed you my Part 1 here. I did Part 2 on the day it was published:
Part 3 came out last week. I worked on it yesterday for quite a few hours (had to frog a whole round, boohoo) and finished it this morning - just in time, as Part 4 was released today.
Working on Part 4 now, so to be continued. Really enjoying this Crochet-A-Long - I'm learning so much!
Saturday, 18 November 2017
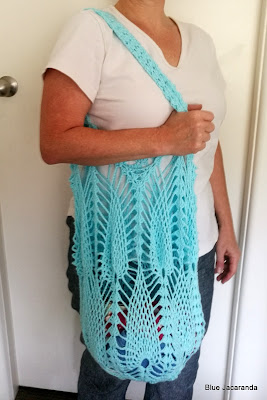
Pineapple Bag
My Pineapple Bag is finished! I think I'll use it for the beach - in the photo above it holds a towel, my swimsuit and a book, and there is room enough for more stuff like sunscreen, a bottle of water etc.
I really enjoyed making this bag, and I love how it looks. For a beginning crocheter it was a challenging pattern - but I like a challenge, so no problem ;-)
It's a big bag, it can hold a lot of stuff - but it stretches a lot, so I wouldn't use it for really heavy things. It would be perfect for yarn shopping!
The pattern starts with a magic loop which I hadn't used before, but I'm glad to say I mastered it (I found these instructions very useful).
I used up almost all of my 200g ball of yarn to make this bag. The ball on the right is what is left of it:
The details:
Pineapple Bag
Pattern: Pineapple Market Bag by Emmhouse
Yarn: Bendigo Woollen Mills Cotton 8 ply
Hook: 4.0 mm
Wednesday, 15 November 2017
Pineapple
The pineapples are starting to appear in my bag! I am now up to row 30 (a bit further than in the photo), so the end is near. I hope I can finish the bag tomorrow.
Speaking about bags... it's time to announce the winners of the Lined Project Bag Giveaway!
- Patrice has won the Tea Bag
- Kaye has won the Australian Bird Bag
- Kate has won the Abstract Bag
Congratulations to these ladies (I have contacted them), and thank you to everyone who entered!
Sunday, 12 November 2017
Another project, another bag
I've started a new project! It's the Pineapple Market Bag, a pattern by Emmhouse that you can buy here. In the photo above the first 10 rows are done - doesn't it look gorgeous?
I'm now up to row 17 (of 35). I'm using cotton 8ply yarn from Bendigo Woollen Mills, a lovely yarn for crocheting that comes in 200g balls. This beautiful colour is called Arctic.
This is the project bag I use for this project - made with one of my favourite Aboriginal fabrics.
Don't forget that you can still enter my giveaway here to win one of these three project bags! I'll draw the winners on Wednesday 15 November.
And if you want to make your own bag, you can find a tutorial here. I f you do I would love to see a photo!
Wednesday, 8 November 2017
Giveaway!
Would you like to win one of these lined project bags? I'm giving away all three of them! They are great for keeping your crochet, sock knitting or hand sewing projects safe and taking them wherever you go.
Each bag is 11'' (27 cm) square, large enough to hold a few skeins, a crochet hook, scissors and a printed pattern - or whatever it is you want to take with you. To close them just pull the strings on both sides.
To win one of these beauties, you will need to do 3 things:
1. Like the Blue Jacaranda page on Facebook
2. Follow @bluejacarandadesign on Instagram (if you are not on Instagram just skip this step!)
3. Leave a comment on this post, telling me which bag you would like to win
Bag 1 is the Tea Bag:
Bag 2 is the Australian Bird Bag:
And Bag 3 is the Abstract Bag. It's hard to photograph and looks a bit pale compared to the other two, but trust me that this is a lovely fabric in mint, red and cream!
I will draw three winners one week from now, on Wednesday 15 November at 9pm Sydney time.
Anyone can enter, it doesn't matter where you live.
Good luck! (And don't forget that you can always make your own Lined Project Bag using the tutorial I posted earlier this week.)
Monday, 6 November 2017
Lined Project Bag - Tutorial
We had a rainy weekend here in Sydney, so I whipped up four (!) more project bags. They are great for crochet projects, but would also work very well for sock knitting or hand sewing projects.
And they are quick and easy to make - no pesky zippers, 'cause we wouldn't want our precious yarn to get caught up in a zipper, right?
If you can sew a straight line, you can make these bags. And you could easily make one in an evening.
I took photos of every step of the process, and have written it out here if you want to give it a go. If you'd rather be crocheting or knitting, stay tuned for I will be giving away some of these bags here on the blog later this week!
You will need:
Materials:
- two 12'' (25cm) squares of fabric for the outside
- two 12'' (25 cm) squares of lining fabric
- two 11'' x 5'' (28 x 13 cm) rectangles of lining fabric
- two 20'' (50 cm) pieces of cord or ribbon
- pair of toggles (optional)
Tools:
- ruler
- fabric marker
- scissors
- pins
- matching or contrasting thread (I use and recommend Aurifil threads)
- sewing machine
- iron and ironing board
- safety pin
- 2 small bulldog clips
1. Take the two outer fabric squares, right sides together, and pin along the side and bottom edges. If you are using a directional fabric like I did, make sure the top is facing up. Sew the three sides together using a 1/2'' (1 cm) seam allowance. Backstitch at the start and end.
2. Do the same for the lining fabric squares.
3. Now take one corner of one of the bags you have just sewn (I'll show my lining one here, as it's easier to see on the lighter fabric) and arrange it so that the side seam sits on top of the bottom seam, like this:
The photo above shows the side seam. If you lift up the corner you'll see the bottom seam:
Make sure the seams are folded to the same side. When they are perfectly matched, pin them together. Take your ruler, line it up with the seam, and find the point where the distance from one side to the other is 2.5'' (6.35 cm) - this is how wide the bottom of the bag will be. Use your fabric marker to draw a line on the fabric.
4. Sew along this line, backstitching at the start and end.
5. Cut off the corner 1/4'' (0.5 cm) from the seam:
6. Repeat steps 3-5 for the other corner. The inner bag now has a nice flat bottom:
7. Repeat steps 3-6 for the outer fabric bag.
8. Turn the outer fabric bag right side out. Fold in the top edge 1/2'' (1 cm) and press. It now looks like this:
9. Leave the lining fabric bag wrong side out. Fold out the top edge 1/2'' (1 cm) and press. It now looks like this:
10. Place the lining bag in the outer bag with wrong sides facing. Match up the side seams and pin them together. Small bulldog pins are useful to do this, or binding clips if you have them.
11. Take one of the lining fabric rectangles and fold in the short edges 1/2'' (1 cm). Press.
12. Now fold the rectangle in half lengthwise and press.
13. Repeat steps 11 and 12 with the other lining rectangle.
14. Take one of the folded lining rectangles and insert it between the inner and outer bag with the folded side on top. About 1'' (2.5 cm) of the rectangle should pop out. Pin the rectangle in place, as shown in the photos below. Make sure the edges of the inner and outer bag are neatly lined up.
15. Sew the inner and outer bag together with the lining fabric in between. Start at one side seam and end at the other, backstitching at both ends. Sew a few millimetres from the edge of the outer bag, taking care not to catch the other side of the bag in your sewing.
16. Repeat steps 14 and 15 for the other side.
17. Use a darning needle or safety pin to guide one piece of cord or ribbon through one sleeve and back through the other.
18. Starting at the other side, guide the other piece of cord or ribbon through one sleeve and back through the other. Tie the two ends on both sides together or use toggles.
19. Put your project in the bag, pull on the ends, and voilà ! Your new project bag is finished!
If you have any questions about this tutorial, just leave a comment here and I will do my best to answer it. And if you make a project bag, I would love to see a photo!
You are free to use this tutorial to make project bags and sell them. Please do link back to this blog post as the source of the pattern for the bags.
Subscribe to:
Posts (Atom)