A few years ago, I made a series of optical illusions quilts. One optical illusion I always wanted to turn into a quilt is the Café Wall Illusion. In this one all the horizontal lines are parallel, even though they appear to be sloped. There's a building in Melbourne featuring this illusion - I discovered it during my sixth visit to Melbourne in May 2017 and took this photo from the SkyBus:

When we were in Canberra in December 2017, we also saw the illusion: it was, very appropriately, on the wall in the café of Questacon, the National Science and Technology Centre:

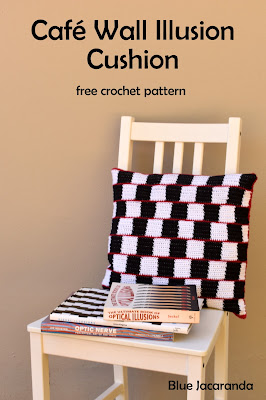
The quilt never got made by me (other quilters did make it - here is an example), but after another trip to Melbourne in May last year I decided to try and crochet a Café Wall Illusion Cushion. And voilà!

I crocheted the front panel of the cushion in the Café Wall pattern (read on for the instructions), then crocheted a plain red back, and sewed them together:

To create a crochet pattern in multiple colours, I used a technique that was new to me: tapestry crochet. It isn't difficult, as you only use one crochet stitch throughout: the single crochet (sc) in US terms (double crochet (dc) in UK terms).When changing colours in a row, you carry the first colour along and 'hide' it in the stiches of the new colour. If you're new to tapestry crochet too, I recommend having a look at a this step-by-step photo tutorial by Lilla Bjorn Crochet.
Tapestry crochet is often done in the round, but can be done back and forth in rows as well, as I have done here. I have written out the instructions for every row, but looking at the graph will help you understand the pattern. It's pretty simple!
I cut the red yarn after each red row, and the black and white yarn after each block of black and white squares, but you could also carry them over to the next row/block.
Café Wall Illusion Cushion
Finished size: 41 cm / 16 in square
Materials
Yarn: I used Bendigo Woollen Mills Cotton 8 ply (DK) in red, black and white. This yarn comes in 200 g (484 metres / 529 yards) balls - I used about 100 g of each colour.
Hook: 4mm (G)
16 inch / 41 cm pillow insert
Scissors
Tapestry needle
Gauge: 22 stitches and 20 rows = 10 cm
Abbreviations used
ch = chain
sc = single crochet (UK dc)
st = stitch
Directions for front panel - see graph below.
With red, ch 91.
R1: sc in the second ch from hook and in each st across, ch 1, turn. (90)
R2: *change to black, sc 9. Change to white, sc 9. Repeat from * until end of round. Ch 1, turn. (90)
R3: *sc 9 in white, sc 9 in black. Repeat from * until end of round. Ch 1, turn. (90)
R4: repeat R2
R5: repeat R3
R6: repeat R2
R7: repeat R3
R8: repeat R2
R9: repeat R3
R10: repeat R2
R11: change to red, sc in each st across, ch 1, turn. (90)
R12: change to white, sc 4. *Change to black, sc 9. Change to white, sc 9. Repeat from * 3 times. Change to black, sc 9. Change to white, sc 5, ch 1, turn. (90)
R13: sc 5 in white, *sc 9 in black, sc 9 in white. Repeat from * 3 times. Sc in 9 in black, sc 4 in white, ch 1, turn. (90)
R14: repeat R12
R15: repeat R13
R16: repeat R12
R17: repeat R13
R18: repeat R12
R19: repeat R13
R20: repeat R12
R21-80: repeat R1-20 4 times
R81: change to red, sc in each st across. Fasten off and weave in ends.

(many thanks to Meghan from Meghan Makes Do for the tutorial on how to create these charts!)
Directions for back panel
With red, ch 91.
R1: sc in the second ch from hook and in each st across, ch 1, turn. (90)
R2-80: sc in each st across, ch 1, turn. (90)
R81: sc in each st across. Fasten off and leave a long tail to sew front and back panels together.
Assembly
Place the front and back panel wrong sides together and sew 3 sides together. Place the pillow insert inside and sew the remaining side closed.
Sit back and admire your Café Wall Illusion Cushion!

2 comments:
You are a very capable individual!
Hi there, just wanted to say, I enjoyed this blog post.
It was practical. Keep on posting!
Post a Comment