Tuesday 27 June 2017

Oven Mitt - Tutorial


Only three more sleeps and then we are off to the Netherlands! I can't wait to be back in my home country, see family and friends again after 2.5 years, speak Dutch all the time, ride a bike everywhere without a helmet and eat lots of Dutch cheese and licorice!We will also take the boys on a city trip to Rome for a few days, that is going to be so much fun!!

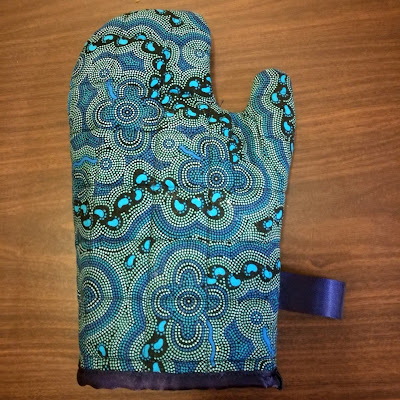
We will be staying in a few different places while we are in the Netherlands. I thought that it would be nice to have some small, handmade gifts for our hosts, so decided to use some of the Australian fabrics in my stash to whip up a few oven mitts. They're quick and easy to make - I took some pictures along the way to show you how. They make great seasonal presents as you can use any fabric you like (Christmas oven mitts? why not!)

I found some Insul-Bright heat resistant batting in my fabric cupboard (from when I made a tea cosy in 2013), which of course is great for oven mitts. I added a layer of cotton batting to get nice and thick mitts. If you don't have any Insul-Bright, two layers of cotton batting will also work.

You will need: 
- two 8'' x 12'' (20 x 25 cm) rectangles of your chosen fabric
- two 8'' x 12'' (20 x 25 cm) rectangles of Insul- Bright batting
- two 8'' x 12'' (20 x 25 cm) rectangles of cotton batting
- two 8'' x 12'' (20 x 25 cm) rectangles of lining fabric
- matching or contrasting thread
- 24'' (60 cm) ribbon or double-fold bias tape
- sewing machine (a walking foot is recommended for sewing through multiple layers)
- safety pins
- binding clips


1 Use one of your oven mitts to create a template, by placing it on a piece of paper and tracing around it, adding a seam allowance of 1'' (2.5 cm). (If you don't have an oven mitt, trace around your hand with a 2'' (5 cm) seam allowance) Cut out the template.

2 Make a fabric sandwich from the following layers: the outer fabric on top, right side up; the Insul-Bright next, shiny side up; the cotton batting next, and the lining fabric at the bottom, wrong side up.

3 With the walking foot attached to your sewing machine, quilt the sandwich in horizontal and vertical lines:


4  Make a second sandwich in the same way and quilt it.

5 Pin the template to the front of one of the fabric sandwiches and cut it out.


6 Flip the template over and pin it to the front of the other sandwich. Cut it out.


7 Place both parts of the oven mitt right sides together.

8 Cut a 6'' (15 cm) piece of ribbon, fold it in half, and place it 2'' (5 cm) from the bottom edge of the mitt in the side seam between the two parts, facing inwards with the rough edges aligning.

9 Use binding clips to clip the two parts together. (pinning through so many layers is really hard!)


10. Sew all around the edges, leaving the bottom edge open. Trim the seams where necessary to reduce bulk.


11. Turn the mitt right side out. Fold the remaining ribbon around the bottom edge and sew it in place. Use one or two binding clips to keep the ribbon from moving and replace them as you go. Fold the last 1/2'' (1 cm) in for a neat finish.


12 Admire your finished oven mitt!
Friday 23 June 2017

White Winter Scarf


Today I finished my White Winter Scarf. It's so soft!


The pattern is the Irish Hiking Scarf by Adrian Bizilia, a free Ravelry download. I used 4 skeins of 10 ply merino from The Australian Wool Store on Etsy.

Sunday 11 June 2017

My First Socks


Today was a dreary, miserable day here in Sydney (oh, how we miss Brisbane...), which meant that a lot of knitting was done. See here the result: I finished my first pair of socks!!!


I love them, they look great and they are so comfy!
I found the pattern (Basic Ribbed Socks by Kate Atherley, a free Ravelry download) very easy to follow and the yarn (Zitron Trekking XXL) a pleasure to work with.
And I had a ball making photos of the socks while wearing them!


Of course I have already started on a new project: a white cabled scarf, to go with my new black winter coat. The pattern is the popular Irish Hiking Scarf by Adrian Bizilia, also a free Ravelry download (gotta love Ravelry!) The yarn is a lovely soft merino from The Australian Wool Store on Etsy.


And here is the Sydney Temperature Scarf with the month of May added - which had the first day this year where the maximum temperature did not reach 15 degrees Celsius:

Friday 9 June 2017

Sydney is off to America!


Sydney is going to the US! I heard today that it has been selected to be judged at the World Quilt Competition 2017 and will hang on display during the event from 17-19 August 2017 in Manchester, New Hampshire. After that it will tour the United States and be displayed at the Pennsylvania National Quilt Extravaganza in September; at the Pacific International Quilt Festival in California in October; and at World Quilt Florida in January 2018.

I love it when my quilts go to places I've never been!

Friday 2 June 2017

Melbourne


Last week I was in Melbourne for the National Gymnastics Championships - my eldest son Hugo competed in Level 8 Under 14. Hugo did well and his team won gold, so he was very happy.


I stayed in South Yarra and spent quite a bit of time photographing the beautiful art deco buildings in this suburb:


More photos of these buildings on my photo blog.


I wouldn't normally go to McDonald's without the kids, but I took the bus to Clifton Hill to have lunch here. Isn't this building fabulous!


Afterwards when waiting to cross the road these two beauties passed by!


Of course I had to quickly check out the street art in AC/DC Lane and Hosier Lane:


More street art pics here on the photo blog.


I also found a yarn shop: Morris & Sons in Collins Street.


I bought some self-striping sock yarn and a beautiful screen-printed project bag:


I spent a lovely day with a Dutch friend and her little boy in St Kilda - more art deco, and, of course, the Luna Park:


This was my sixth visit to Melbourne - how come I never noticed the building with the café wall illusion before?


A few years ago, when I made my optical illusion quilts, I planned to make a café wall quilt. It didn't happen and now it probably never will... I would like to make an art deco quilt though!