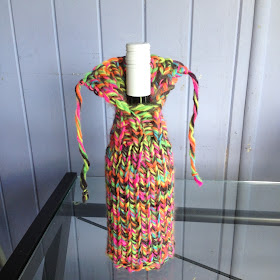
Last weekend I stayed two nights at a friend's place in Sydney and brought her a nice bottle of white wine as a thank-you gift. I thought about how to present it and decided to knit a jumper (sweater), using the skein of multi-coloured super-bulky yarn that I bought the other day because I couldn't resist it ;-). It's almost summer here Down Under, so yes, it's a silly present, but hey, I need a creative outlet now that my sewing machine is in storage!

I measured the circumference of the wine bottle (25 cm / 10 inch) and assuming the gauge on the label (8 stitches = 10 cm / 4 inch) to be correct, cast on 20 stitches on 10 mm (US 15) circular needles. I started knitting in stockinette stitch until the cover was 15 cm / 6 inch high:

Then decreased a few times, knitted some more rows in rib stitch and cast off tightly.

That cover looked alright, but I thought it could be improved a bit by starting in rib stitch, as the bottom edge tends to curl (although this isn't really a problem when it is stretched over the bottle):

I also decided a 'collar' on the jumper would look good. There was just enough yarn to finish the second cover!

The instructions on how to knit these covers are below, if you would like to make one yourself. My very first knitting pattern! (please let me know if you spot any mistakes or if anything isn't clear)
This is a very quick and easy project, suitable for beginning knitters.
Wine bottle cover
Yarn: Electric Beat Jambi Licorice by Passioknit, 90% acrylic, 10% wool (super bulky). One skein (100g /58m/63yd) makes two covers.
Needles: 10 mm / US 15 / UK 000 circular needles. For cover B you also need a pair of regular needles to knit the 'collar'.
Gauge: 8 stitches x 12 rows = 10 x 10 cm / 4 x 4 inch
Circumference bottle = 25 cm /10 inch
Abbreviations used:
sts = stitches
k = knit
p = purl
k2tog = knit 2 stitches together
Directions for Cover A:
Cast on 20 sts on the circular needles.
Row 1-24: Stocking stitch (stockinette - knit the odd rows, purl the even rows) in the round until you have reached 15 cm / 6 inch. Adjust the number of rows if necessary.
Row 25: Decrease as follows: *k2tog, k3* repeat until the end.
Row 26: Purl (16 sts).
Row 27: *k2tog, k2* repeat until the end.
Row 28: Purl (12 sts).
Row 29-36: Rib stitch (k1, p1)
Row 37: Bind off tightly. Weave in the loose ends.
Directions for Cover B:
Cast on 20 sts on the circular needles.
Row 1-2: Rib stitch (k1, p1).
Row 3-24: Continue in stocking stitch (stockinette - knit the odd rows, purl the even rows) in the round until you have reached 15 cm / 6 inch. Adjust the number of rows if necessary.
Row 25: Decrease as follows: *k2tog, k3* repeat until the end.
Row 26-28: Stockinette (you now have 16 sts).
Row 29-36 Rib stitch (k1, p1).
Row 37-44 Switch to regular needles and continue the rib stitch.
Row 45: Bind off.
Weave in the loose end at the bottom. Leave the loose end at the top. Attach a piece of yarn to the other side of the ‘collar’. Tie a knot in both ends to prevent fraying.
This is such a lovely way to “wrap” a gift bottle. Bravo to you for designing it and sharing thevpattern. I will remember (I hope!) to post a photo of mine when it’s done. Thank you!
ReplyDelete